
ra2 studio - Fotolia
Manage Windows Virtual Desktop with a PowerShell script
IT admins can use PowerShell scripting to manage Microsoft Windows Virtual Desktop. In this step-by-step guide, IT can learn the details of this management method.

It's well-known that Microsoft launched its Windows Virtual Desktop technical preview, but Microsoft also released a lesser-known PowerShell module. IT can use this script to deploy the environment and use PowerShell commands to manage the environment.
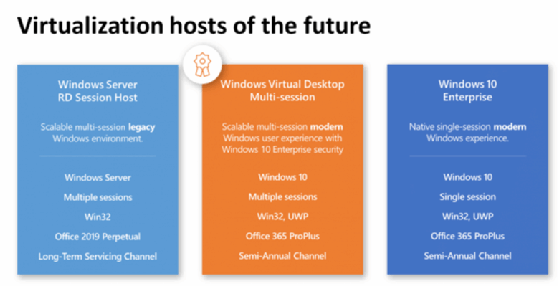
Microsoft Windows Virtual Desktop is a complete desktop as a service powered by Azure. The infrastructure doesn't require any virtual machines, because it runs as a service from Azure. IT only needs to run the Session Host VMs in Azure.
These VMs can run multi-user Windows 10, an optimized version of Windows 10 that delivers multi-user capability, as well as a full integration with Office 365 ProPlus. Users can sign into the environment with a HTML5 browser or the new Remote Desktop Client.
Scripting Microsoft Windows Virtual Desktop
Microsoft created a new PowerShell module called Microsoft.RDInfra.RDPowerShell. During Microsoft's technical preview, PowerShell is the only way to manage the Windows Virtual Desktop environment.
IT pros can combine this new module with the Azure Resource Manager and Azure Active Directory modules to create one script that will do the following:
- Install and import the PowerShell modules.
- Grant the Tenant Creator role to the Tenant Admin.
- Create the tenant.
- Create a Resource Group.
- Provision a multi-user Windows 10 with Office ProPlus host pool.
- Grant access to the host pool for users.
IT admins, however, cannot script one task yet: the authorization of Windows Virtual Desktop to an Azure environment. IT needs to do this through the Windows Virtual Desktop consent page. IT pros should enter their AAD Tenant global unique identifier (GUID) on the website.
To find the GUID, IT can enter into the Azure Portal and click on Azure Active Directory, then click on Properties. IT should paste this GUID into the website and click submit.
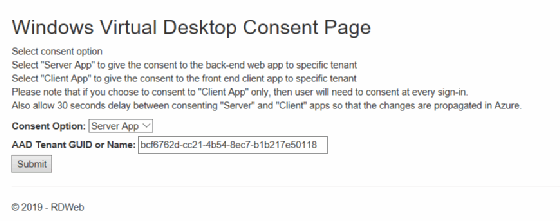
Then, IT pros need to sign in with the Azure account that they want to make Tenant Admin. It's important to know that multifactor authentication is not allowed for the Tenant Admin.
When IT admins sign in, they will be asked to allow Windows Virtual Desktop access to their tenant. They should click Accept and repeat the same steps, but select Client App instead of Server App (Figure B). IT must enter the right parameters under User Parameters in the script. Then, they can let the script do the rest.
IT must run the following script as an administrator:
### Create complete Microsoft Windows Virtual Desktops Enviroment

### Before running this script autorize your tenant by going to: https://rdweb.wvd.microsoft.com/

### User Parameters
$TenantAdminName = "[email protected]" ## MFA is not supported for Tenant Admn
$TenantName = "newtenant01" ## New WVD Tenant Name
$tenantAdminPassword = read-host "Please enter Tenant Admin password" -AsSecureString
$SubscriptionID = "aaaaaa-aaaaaaaa-aaaaaaa" ## Azure Subscription ID
$AzureADID = "bbbbbbb-bbbbbbb-bbbbbb" ## Azure Active Directory ID, can be found in properties in Azure Active Directory
$resourceGroupName = "WVD-Pool" ## Name for new or empty resource group for Host Pool
$resourceGroupLocation = "westeurope" ## Location for resource group for Host Pool
$rdshNamePrefix = "WVDMachine" ## Prefix of the VDI pool machines that will be created
$rdshNumberOfInstances = "1" ## Number of VM's to be created in the Pool
$rdshVMDiskType = "Premium_LRS" ## Disk type
$rdshVmSize = "Standard_D4s_v3" ## VM size
$domainToJoin = "contoso.com" ## Domain to join the VM's
$existingDomainUPN = "[email protected]" ## UPN of domain admin
$existingDomainPassword = read-host "Enter domain admin password" -AsSecureString  ## Password of domain admin
$ouPath = "" ## Path to OU where VM will be created. Leave emptye and they will default go in to computer OU
$existingVnetName = "Azure-VNet-01" ## Vnet that is connect to Active Directory
$existingSubnetName = "default" ## Name of the subnate in the VNet
$virtualNetworkResourceGroupName  = "Azure-Resource-Group-01" ## Name of resource group where VNet is located"
$existingTenantGroupName = "Default Tenant Group" ## Tenant group name default is Default Tenant Group
$hostPoolName = "NewPool" ## Name of the new host pool
$defaultDesktopUsers = "[email protected],[email protected]" ## User who get acces to the new WVD desktop

### Default Parameters
$rdshImageSource = "Gallery"
$vmImageVhdUri = ""
$rdshGalleryImageSKU = "Windows-10-Enterprise-multi-session-with-Office-365-ProPlus"
$rdshCustomImageSourceName = ""
$rdshCustomImageSourceResourceGroup = ""
$enableAcceleratedNetworking = $false
$rdshUseManagedDisks = $true
$storageAccountResourceGroupName = ""
$newOrExistingVnet = "existing"
$existingTenantName = $TenantName
$enablePersistentDesktop = $false
$tenantAdminUpnOrApplicationId = $TenantAdminName
$isServicePrincipal = $false
$location = $resourceGroupLocation


### Importing and Installing modules
Write-host -foreground Green "Installing and Importing PowerShell Modules"

# Azure Active Directory Module
if (Get-Module -ListAvailable -Name AzureAD)
{
     Import-Module AzureAD | Out-Null
}
else
{
     Install-Module -Name AzureAD -scope AllUsers -Confirm:$false -force
     Import-Module AzureAD | Out-Null
}

# Azure RM Module
if (Get-Module -ListAvailable -Name AzureRM)
{
     Import-Module AzureRM | Out-Null
}
else
{
     Install-Module -Name AzureRM -scope AllUsers -Confirm:$false -force
     Import-Module AzureRM | Out-Null
}

# RD Infra Module
if (Get-Module -ListAvailable -Name Microsoft.RDInfra.RDPowerShell)
{
     Import-Module Microsoft.RDInfra.RDPowerShell | Out-Null
}
else
{
     Install-Module -Name Microsoft.RDInfra.RDPowerShell -scope AllUsers -Confirm:$false -force
     Import-Module Microsoft.RDInfra.RDPowerShell | Out-Null
}

### Connect to Azure AD
write-host -ForegroundColor Yellow "Enter your Azure Active Directory Crendentials"
Connect-AzureAD

### Assign admin RDS TenantCreator Role
$username = $TenantAdminName
$app_name = "Windows Virtual Desktop"
$app_role_name = "TenantCreator"

# Get the user to assign, and the service principal for the app to assign to
$user = Get-AzureADUser -ObjectId "$username"
$sp = Get-AzureADServicePrincipal -Filter "displayName eq '$app_name'"
$appRole = $sp.AppRoles | Where-Object { $_.DisplayName -eq $app_role_name }

# Assign the user to the app role
New-AzureADUserAppRoleAssignment -ObjectId $user.ObjectId -PrincipalId $user.ObjectId -ResourceId $sp.ObjectId -Id $appRole.Id | out-null
sleep 5

### Creating new WVD Tenant

# Sign into WVD Environment
Write-Host -ForegroundColor yellow "Enter your Tenant Admin Credentials"
Add-RdsAccount -DeploymentUrl "https://rdbroker.wvd.microsoft.com"

# Creating new WVD Tenant
New-RdsTenant -Name $TenantName -AadTenantId $AzureADID -AzureSubscriptionId $SubscriptionID

### Deploying new host Pool with AzureRM

#Sign into Azure
Write-Host -ForegroundColor yellow "Enter your Azure Admin Credentials"
Login-AzureRmAccount

# Register RPs
Function RegisterRP {
    Param(
        [string]$ResourceProviderNamespace
    )

    Write-Host "Registering resource provider '$ResourceProviderNamespace'";
    Register-AzureRmResourceProvider -ProviderNamespace $ResourceProviderNamespace;
}

$resourceProviders = @("microsoft.resources","microsoft.compute");
if($resourceProviders.length) {
    Write-Host -ForegroundColor Green "Registering resource providers"
    foreach($resourceProvider in $resourceProviders) {
        RegisterRP($resourceProvider);
    }
}

# Create or check for existing resource group
$resourceGroup = Get-AzureRmResourceGroup -Name $resourceGroupName -ErrorAction SilentlyContinue
if(!$resourceGroup)
{
    Write-Host -ForegroundColor Green "Creating resource group '$resourceGroupName' in location '$resourceGroupLocation'";
    New-AzureRmResourceGroup -Name $resourceGroupName -Location $resourceGroupLocation
}
else{
    Write-Host -foreground Yellow "Using existing resource group '$resourceGroupName'";
}
# Start the deployment
Write-Host -ForegroundColor Green "Starting Host Pool deployment this can take some time (~15min)..."
$templatefile = "https://raw.githubusercontent.com/Azure/RDS-Templates/master/wvd-templates/Create%20and%20provision%20WVD%20host%20pool/mainTemplate.json"
New-AzureRmResourceGroupDeployment -ResourceGroupName $resourceGroupName -Name "New-WVD-HostPool" -TemplateUri $templatefile `
-tenantAdminPassword $tenantAdminPassword `
-rdshNamePrefix $rdshNamePrefix `
-rdshNumberOfInstances $rdshNumberOfInstances `
-rdshVMDiskType $rdshVMDiskType `
-rdshVmSize $rdshVmSize `
-domainToJoin $domainToJoin `
-existingDomainUPN $existingDomainUPN `
-existingDomainPassword $existingDomainPassword `
-ouPath $ouPath `
-existingVnetName $existingVnetName `
-existingSubnetName $existingSubnetName `
-virtualNetworkResourceGroupName $virtualNetworkResourceGroupName `
-existingTenantGroupName $existingTenantGroupName `
-hostPoolName $hostPoolName `
-defaultDesktopUsers $defaultDesktopUsers `
-rdshImageSource $rdshImageSource `
-vmImageVhdUri $vmImageVhdUri `
-rdshGalleryImageSKU $rdshGalleryImageSKU `
-rdshCustomImageSourceName $rdshCustomImageSourceName `
-rdshCustomImageSourceResourceGroup $rdshCustomImageSourceResourceGroup `
-enableAcceleratedNetworking $enableAcceleratedNetworking `
-rdshUseManagedDisks $rdshUseManagedDisks `
-storageAccountResourceGroupName $storageAccountResourceGroupName `
-newOrExistingVnet $newOrExistingVnet `
-existingTenantName $existingTenantName `
-enablePersistentDesktop $enablePersistentDesktop `
-tenantAdminUpnOrApplicationId $tenantAdminUpnOrApplicationId `
-isServicePrincipal $isServicePrincipal `
-location $location
### Checking Host Pool
$hostPool = Get-RdsHostPool -TenantName $tenantName -Name $HostPoolName
if(!$hostpool){
 write-host -ForegroundColor red "Something went wrong check te deployment in the resource group"
}else{
 write-host -ForegroundColor green "WVD Tenant is created and users can now sign in to https://rdweb.wvd.microsoft.com/webclient/index.html"
}
When the script is done, IT pros should go to the following address and sign in as the user they specified. Now, they can limitedly start working on Windows 10 and Office Pro Plus.
To manage Windows Virtual Desktop, admins can use the PowerShell commands or download a Windows Virtual Desktop management GUI tool.