How to build a native-boot VHD for Windows 7 in a few simple steps
Booting natively to a VHD in Windows 7 can be a complicated. This step-by-step guide breaks down and simplifies the process.

This is the third article in a series on virtual hard disks in Windows 7. Part one explores the benefits of the native-boot feature in Windows 7 and Windows Server 2008 R2, and part two provides in-depth steps for booting natively to a VHD.
The process for building a native-boot virtual hard disk for Windows 7 can be broken into the following three steps:
- Build a VHD with the new options in the Disk Management snap-in.
- Put a Windows 7 or Windows Server 2008 R2 bootable image on the VHD.
- Add the image to the boot manager (BCD). This allows booting to the new VHD image rather than the original installation. The initial boot will run through normal setup and require multiple reboots before the final logon.
Only the Enterprise and Professional versions of Windows 7 support native VHD boot. You can build a bootable VHD image, boot into the VHD and successfully run setup with the Ultimate and Starter versions. However, when you go to log on, the following error will appear:
License Error
Booting from a vhd is not supported on this system.
As a result, logon will fail, and reinstallation will be required.
Furthermore, although only Windows Server 2008 R2 and Windows 7 are capable of a VHD boot, you can adapt Vista to boot from VHD by replacing the Vista Boot Manager with the Windows 7 one.
There are several ways to create a Windows image on a VHD:
- Create a WIM image file with the Windows Automated Installation Kit (WAIK).
- Install boot to VHD on bare metal -- with no OS installed -- as shown in this webcast on Dan Stolt's TechNet blog.
While these methods work, the quickest and easiest way is to use an existing Windows 7 image.
More on virtual hard disks in Windows 7
Part 1: Benefits of native-boot VHDs in Windows 7
Part 2: Unlocking the possibilities of native-boot VHD in Windows 7
The Windows 7 and Windows Server 2008R2 DVDs contain an Install.wim file in the \Sources directory, which is the Windows 7 image used during setup instead of all the files that setup used previously. This is stored on the DVD in \Sources\Install.WIM, and this image can be used to create others.
Of course, this is just the base install. If you want to build custom images with apps, etc., you will need to use something like the WAIK. In addition, Sysprep can be used to build virtual machine images.
Steps to a native-boot VHD
To simplify the method, the following example uses the Install.wim file from the Windows 7 DVD.
- On a Windows 7 client, create a directory to keep the files needed for this process. I created C:\VHD.
- You need a copy of Imagex, a utility used to apply the Install.wim file to the VHD. This is a single .exe you can get from Microsoft by downloading and burning the WAIK v2.0 to a DVD and then extracting Imagex.exe. Or you can download Imagex.exe alone. Put Imagex.exe in C:\VHD.
- Browse the Windows 7 Enterprise or Professional DVD. Go to the \Sources directory and copy the Install.wim file to C:\VHD.
-
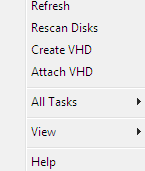
Create the VHD. In the disk management options, select Apply, then Create VHD (Figure 1).
Figure 1: Disk management options
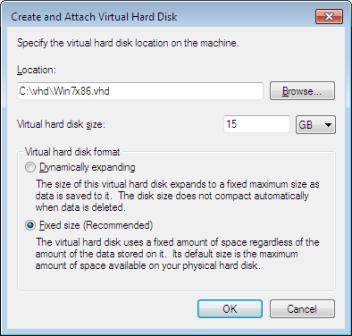
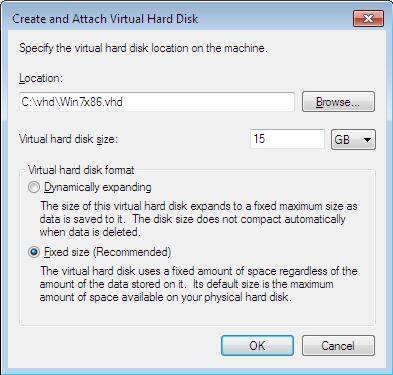
- In the Create and Attach VHD wizard (Figure 2), do the following:
- Browse to the directory (C:\VHD) and enter a filename like Win7Enterprise.vhd. Remember that you may want to have several different images, so make it descriptive.
- Although Windows 7 needs only about 7 GB, you should give it at least 15 GB.
- Select fixed disk size. While a dynamic disk may save disk space, when a dynamic disk boots, it must have the full expanded size in free disk space or it will fail to boot. Always use a fixed disk for VHD boot.
- Select OK to build the VHD. It takes a while -- look in lower right corner of computer management snap-in to see the progress.
- Figure 2: Selecting the type of virtual hard disk (click to enlarge)
- The VHD now shows up as a disk in Disk Management. Right click and initialize the disk. The VHD disk should now show online.
- Right click on the VHD disk and select Simple Volume. In the new simple volume wizard; fill in the specifications as needed.
- Note that in the disk properties, you can select Attach VHD (mount) if it is unattached or Detach VHD (unmount) if it is attached.
-
Now use Imagex to apply the WIM file (Windows image) to the VHD. We previously copied Imagex.exe to the C:\VHD directory.
-
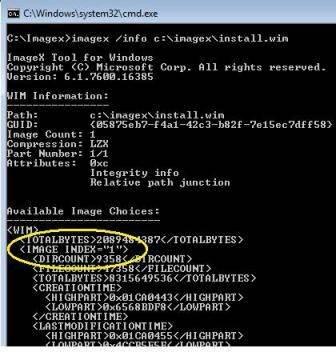
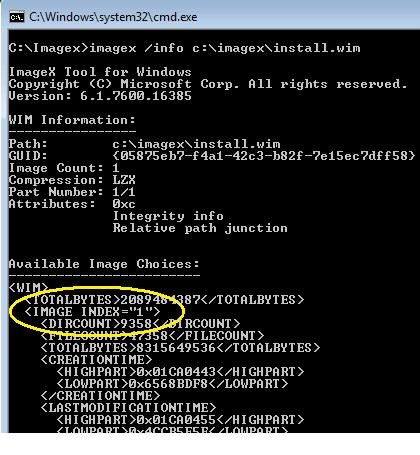
Use the command: Imagex /info c:/vhd/install.wim to dump the information (Figure 3). The Index value shows the version of Windows 7 -- the "1" here indicates this is the Enterprise edition.
Figure 3: BCDEdit commands (click to enlarge)
- Apply the WIM file to the VHD. (In this case, the VHD is the H: drive.)
Imagex /apply c:\vhd\install.wim 1 H:\
The" 1" between the WIM file path and the destination drive letter means we want to install the Enterprise version. Note that this will take a while.
-
- When Imagex finishes, you can see the files on the H: drive.
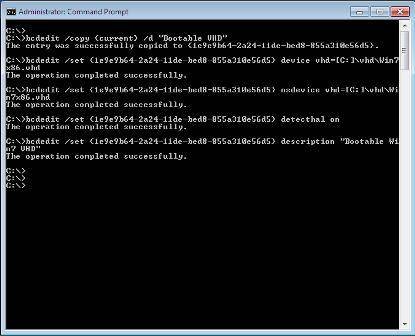
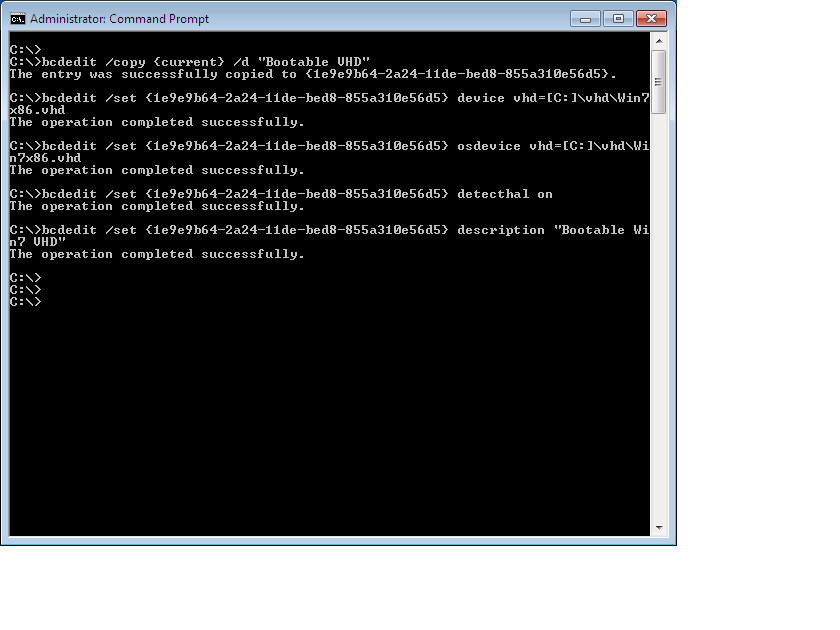
- Modify the boot menu with BCDEdit.
- BCDEdit
- BCDEdit /copy {current} /d "Win7 Enterprise VHD"
-
BCDEdit shows a new entry with the Identifier = {Guid}. Note that this is similar -- but not the same -- as the GUIDs referenced in the other BCD entries (Figure 4).
Figure 4: Modify the boot menu with BCDEdit (click to enlarge)
-
Select the {GUID} string in the paste buffer with the mouse, then enter:
- BCDEdit /set {paste Guid here} Device VHD=[C:]\vhd\Win7Enterprise.vhd
In the VHD= option, enter path to the .VHD created earlier in this process. Note the drive letter of the path is in square brackets []. - BCDEdit /set {paste Guid here} OSDevice VHD=[C:]\vhd\Win7Enterprise.vhd
Note you can just hit the up arrow to recall the previous line and change device to osdevice. - BCDEdit /set {paste Guid here} DetectHAL ON
- BCDEdit /set {paste Guid here} Device VHD=[C:]\vhd\Win7Enterprise.vhd
- Now do a BCDEdit (no options) to dump out the current values.
- BCDEdit
- Reboot. The boot manager should now show the new entry Win7 Enterprise VHD. You can use BCDEdit to modify the descriptive name at any time:
BCDEdit /set {enter Guid} /d "new name for boot menu"
- During the reboot, you will run through the normal setup .
After the installation is complete, note that the VHD (drive H: during configuration) is now the C: drive, and the former drive C: is now drive D: (Figure 5).
Figure 5: VHD disk after boot (click to enlarge)
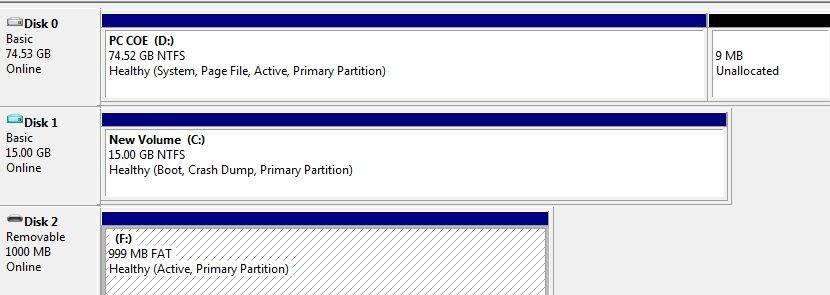
This makes sense because the boot drive should be C:. However, while the boot volume is switched to the VHD, the page file remains on the original C: drive (now drive D:). The page file stays on the physical partition.
In this example, my laptop can now to boot to Windows Ultimate (the base OS) and Windows Enterprise (the VHD). Of course, only disk space limits the number of VHDs I could create for multiboot scenarios. And since they are portable, I can move them from machine to machine.
The install.wim file that comes with Windows 7 or Windows 2008 R2 can easily be used to create a native VHD boot configuration. However, building custom WIM files allows multiple VHDs -- each with a different configuration -- to be stored on a single physical machine. As a result, the machine can be booted into different configurations. This provides an advantage over using virtual machines because it uses all the native drivers and allows testing in a physical environment.
ABOUT THE AUTHOR
 Gary Olsen is a systems software engineer at Hewlett-Packard in Global Solutions Engineering. He authored Windows 2000: Active Directory Design and Deployment and co-authored Windows Server 2003 on HP ProLiant Servers. Olsen is a Microsoft MVP for Directory Services and formerly for Windows File Systems.