Using VMware ThinApp for application virtualization
Considering virtualizing your apps? See the benefits – and pitfalls – of application virtualization and find steps on how to use VMware ThinApp.
This is the final article in a series on the basics of VMware View.
We are now moving on to our final topic related to VDI, and that's the virtualization not just of operating systems but the applications as well.
There are many benefits to application virtualization, including:
- Less conflicts between one application and another.
- Same app, different versions: The ability to run different versions of the same application in the same Windows environment.
- Keeping virtual desktops lean and mean: Keeping your virtual desktop merely an environment to execute programs rather than storing those applications locally in C:Program Files
- App-on-a-stick: Application virtualization is not limited to virtual desktops. Often you carry your applications around on a memory stick and execute them anywhere because they work within their own "sandbox".
- ThinApps: One key advantage of ThinApp is that virtualization allows for total encapsulation. In other words, there is no need to install a special client at the destination where the ThinApp will run: A ThinApp is an entirely separate and independent .EXE in its own right.
- Network streaming: Most application virtualization will "stream" itself if delivered over a network location. In other words, it downloads to the client just the files it needs as it needs them. These can often be configured to be cached like Web browsers cache files to speed the application when it is next used.
- ThinApp the View client: If you think about it, one of the challenges of deploying View is that a client needs to be installed to a physical PC. One simple remedy to this process is to create a ThinApp of the client. This also means when the client needs upgrading, you can merely publish a new version of the ThinApp.
Limitations and requirements
It's worth acknowledging that some of these issues are a pain regardless if you use application virtualization or not. For example, the Licensing and Activation process can be a royal pain in the rear. You could argue that any large corporate with a dedicated application packaging and deployment team would look at these issues and say "Well, yes we have to manage these with or without application virtualization, and anyway – application virtualization is one tool that helps us deal with those crummy installers."
Some additional limitations and requirements include:
Application is not installed natively: One of the selling points of virtual desktops compared to the shared desktop model is that applications can be installed "natively" to the client operating system. But, by definition, if we use application virtualization this is no longer the case. One of the downsides of application virtualization is the almost inevitable possibility that the original software vendor may not support using VMware ThinApp or other tools.
Software with drivers: Typical software that installs or requires some kind of kernel mode driver will in most cases be impossible to capture in the application virtualization software. For example, you cannot create a ThinApp of VMware Workstation. When VMware Workstation installs, it adds drivers to the underlying Windows OS and messes with the underlying network infrastructure as well. This might also extend to scanner software and webcam software. Previously, I indicated creating a ThinApp of the View client. I would recommend if you do this, not to include the virtual printing or USB redirection service, as both of these install kernel mode drivers.
File associations: Although you can have three flavors of Acrobat Reader or Microsoft Word, only one of them can logically "own" the file associations of the application. So when you double click at a PDF file the question would be which ThinApp would be used as the default application? Most application virtualization vendors will have a method of setting a preference. In the case of View, it uses an .INI file.
Support politics: If you think running an application or service inside a VM with source code totally unmodified can be political in the sense that an application vendor may not be "officially" support it, how do you think these same application vendors respond to virtualizing their client applications? So, expect to see references to "re-engineering" and "not by design". Just like with some service providers, these client application guys need to catch up. And like with virtual appliances, distributing a client application that runs preconfigured and independently of the Windows OS without an "installation" routine is the way to go.
Licensing and activation processes: As with virtual machines and the guest operating system, you will really want to hunt down and use so-called "Corp" editions that often allow for bulk-activation, or even bypass the activation process altogether. ThinApp doesn't change your application vendor's license policy – after all ThinApp merely captures the install you would have done if you didn't own some kind of application virtualization software. So if you want to run 20 copies of an application, and the vendor says you need a special unique TXT file for each application that runs, the same restriction would apply to a ThinApp. The last thing you want to do is to have to create 20 ThinApps; that kind of defeats the object of the exercise.
Dependences captured: You will need a clean or "base" Windows install every time, so that there are no dependencies present during the "capture" process. This will avoid a situation where .NET application refuses to function because the "source" had .NET installed before the capture process, which was therefore ignored. When the virtual application is loaded on the destination it might fail because .NET is not installed.
Application updates: Most software comes with its own "Hey, I see you are busy working right now. But we've released a new version of this software which fixes all the problems we knew we had in the beta program and we would like to download it to fix it – and then have a whole new bunch introduced that no-one knows the work arounds to." Seriously, when an application tells me it has a new version, I sit and think "Am I tempting fate here?" As an end user who manages his own single PC, I take that decision and live with the fact I'm not patched to the hilt. The same cannot be said for those in the corporate space. It's important to switch off these application updates because they will most likely waste space in the end-user sandbox while at the same time failing because they are not aware they are running in the ThinApp sandbox.
ThinApp every app?: Some organizations decide that large multi-suite application sets like Microsoft Office are best installed locally to the virtual desktop – leaving application virtualization to deliver strategic applications. This is not unlike how many corporates use Citrix XenApp to deliver mission critical services like email and database access, but still continue to install applications locally. Whether such approaches will remain popular as application virtualization improves remains to be seen, however as with server virtualization, we might move to an application "virtualization first" policy with ThinApp or SoftGrid.
Hey, you! Get off of my cloud: Currently most application virtualization is centered on this very popular system you might have heard of called "Microsoft Windows" [imagine I'm doing my Dr Evil impression there – imagine I've just said the word "Death Star" or "Laser"]. As application virtualization does very little at the moment for applications, you may have to deliver thinly from other operating systems such as "Linux". This is something that can only improve mainly because it is so limited right now. VMware have VMware Fusion for Apple Mac which allows you to run Windows applications on Mac. At the moment of writing, Microsoft has a project called Microsoft Enterprise Desktop Virtualization, which will allow Windows XP and Windows 2000 Professional applications to run natively in Windows Vista and Windows 7. Although MEDV is a "Microsoft" only product, there's no reason why VMware or Microsoft couldn't develop a system that runs any application from any platform on one operating system.
How to install ThinApp
- Begin with a clean virtual desktop ideally created from the template that is used to create your virtual desktop pools.
- Download and Install ThinApp by executing the VMware-ThinApp-N.N.N-NNNN.exe
- Accept the EULA
- Input your License String and License Display name
- The "License Display Name" is shown whenever a ThinApp is loaded. When a ThinApp is loaded a small tray icon appears with the name of the application and the license display name. This is used in lieu of the vendor's own "splash" or welcome screen. It may be required to meet the terms and conditions of some EULAs.
- At this point I would take a snapshot of this VM. Alternatively, you could power off the VM, and set the virtual disk to independent/non-persistent. A snapshot is probably more flexible.
Create a ThinApp: Example Acrobat Reader 9
ThinApp is very easy to use and if you have ever used some type of application capturing tool before they feel very much the same – although the quality of them varies. So if you have used Vertias WinInstallLE or Citrix Application Package it is very similar. The difference is that the output is a self-contained .EXE.
Most packaging systems have a four step process:
- Pre-analyze the clean environment (Pre-Scan)
- Install the Application Software (Install)
- Capture the Differences (Post-Scan)
- Output Package to default location (Build)
In the pre-scan and post-scan stages, ThinApp creates its own virtual registry and file system to capture all the changes being made. There is a snapshot taken both before and after, and by comparing the two, ThinApp can then begin the build process.
There are some things you cannot do with ThinApp (and application virtualization in general), and the following are situations that are best avoided in this recording or capturing process:
- If you want to run an application on both Vista and XP, it's best to use Windows XP as the target as there may be software which is the default in Vista -- but not in XP – and this could create a dependency problem.
- Don't package a 64-bit application and expect it to run on a 32-bit virtual desktop. The application still needs to make calls to a 64-bit processor.
- Locate and download Acrobat Reader N installation package.
- Run the ThinApp Setup Capture program and Click Next to the Welcome Screen
- Click next to the information warning about the significance of having a clean PC.
- ThinApp will start the initial pre-scan of the virtual desktop
- At the end of this analysis, minimize the ThinApp Window and trigger the install of Acrobat
Tip: Most application packages allow for a nifty hidden advantage. During this recording process it is possible at the end of the install to load the application and modify the settings. If you do this before the post-analysis, these modifications (in our case to Acrobat Reader 9) will become global defaults for all users who access the ThinApp. This is handy as some application vendors do not support Microsoft GPOs and sometimes are very tight-lipped about the registry locations for various options that might not be desirable in your environment.
For example, I like to load Acrobat Reader and accept the Adobe Acrobat EULA on behalf of my end users. I also like to enable the option to "Restore last view settings when reopening documents" in Edit, Preferences, Documents and Open Settings.
Once you have finished with the installer, close the application, and restore the ThinApp Setup Capture window. Click next and this will trigger the post-scan phase. After the scan has completed, Thin-App will list the "User-accessible entry points". These are EXEs that the user can trigger or have loaded once the main application has loaded.
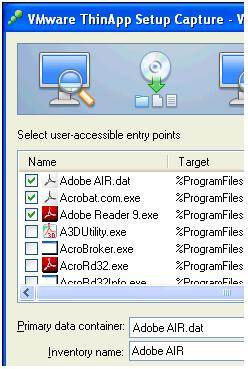
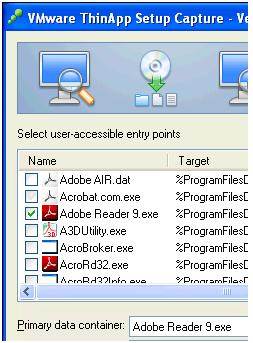
The problem with most application recorders and packagers is that they quite frequently get confused. They often cannot detect the difference between an installer .EXE and the application it is installing. In contrast, ThinApp makes a good job of this. However, I noticed that this dialog box didn't include all the executables. Also, I found I was able to deselect all the .EXEs and just enable the core Adobe Acrobat Reader 9 .exe, as shown in Figures 1A and 1B. This meant I had to change the primary data container from the default of Adobe AIR.dat.
| Figure 1A: Before (click to enlarge) | Figure 1B: After (click to enlarge) |
 |
 |
This generated a second dialog box that warned me that this might be unwise.
Figure 2: Warning dialog box
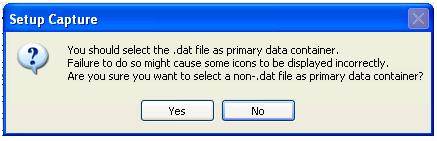
However, being the curious kind of chap I am, I carried on and found the application could work without these other executables. It's worth saying my testing and validation won't be anywhere near as rigorous as yours -- or will it?
The general point I want to make about this dialog box is that every single application will produce different results – and I think you would have to know the application very well before considering deviating from these defaults. For example, the default, shown in Figure 1A, didn't include A3DUtility.exe. Why not? I doubt anyone in VMware OR Adobe could answer that question. My best bet is to ask Adobe what A3DUtilty.exe does, if it's required for the main reader to work -- and what the implications would be if it wasn't included.
In the next window, shown in Figure 3, you can control how the ThinApp will be built.
- Figure 3: Building the ThinApp (click to enlarge)


You can encode Active Directory restrictions that can limit who can run the application. For this to work your VM must be in a domain. The idea is to restrict the portability of VMs such that if a ThinApp leaks out of your organization no one will be able to run without first authenticating to your private, internal and firewalled domain.
To maintain a per-user setting ThinApp allows you to save per-user settings in three different locations (User Profile, USB, Network Drive). As we saw earlier folder redirection can relocate the Application Data part of a user profile to a network location (such as the user's home directory) so a network drive and user profile location could be effectively the same. The USB location is clearly not aimed at a virtual desktop environment but for a more stand-alone mode. This is popular amongst IT staff who can carry a memory stick of their favorite management applications. I've decided to stick with User Profile as I redirect this to the network anyway.
The next dialog box, shown in Figure 4, is a tough one as it is difficult to know 100% in all cases which option to select. There is something to be said for experimentation and rigorous testing.
- Figure 4: Selecting an isolation mode (click to enlarge)
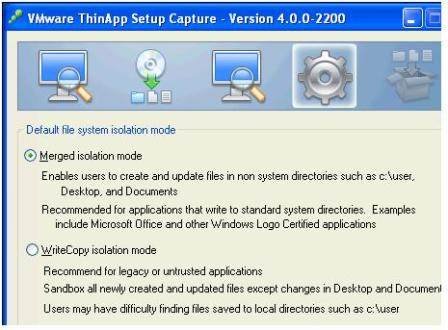

Merge isolation mode is very close to how applications normally behave when they are installed to a conventional desktop. However, in our virtual desktop we can either disable or redirect many of the locations that are referred to here. The recommendation is to select this option for Microsoft Office and Windows Logo Certified applications.
The WriteCopy isolation is recommended for legacy or untrusted applications – and results in a more isolated or sandbox ThinApp. This isolation appeals to me -- and don't worry about users trying to locate local directories -- I hide the A: C: and D: drives. However, I don't regard Acrobat Reader 9 as a legacy application so I'm going to go with merged isolation mode. After all, I don't want the isolation to be so complete that it stops the application working altogether. The reality you will have to experiment and test the application beforehand. As there are often no recommendations from the application vendors themselves, another option is using the VMware ThinApp Forums for other's experiences.
Next select your build options. Shown in Figure 5, this allows you to set where the project files will be located (this is where you will find the ThinApp).
Figure 5: Set the location of the project files (click to enlarge)
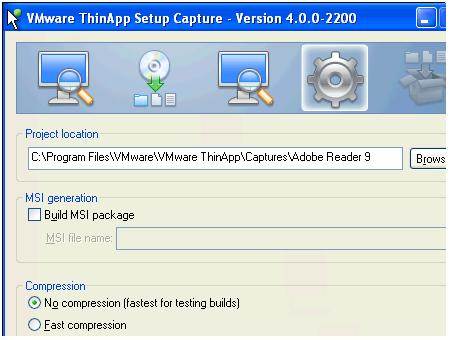
The project location will be the destination of all the files discovered during the post-scan file, together with your ThinApp. The "Build MSI package" option will create an MSI file, which you can then use to copy the ThinApp to the system. Use this if you intend to have the ThinApp running from within the virtual desktop's virtual disk: If you are just testing the application use the Non Compression option, which is generally much quicker. When you're ready to build the application for a product use Fast Compression, as this reduces the time it takes to stream the application to the end-user , but takes significantly longer to build. Large applications like Microsoft Office take a couple of hours.
At the end of the post-scan, you have two choices -- Build or Browse Project -- as shown in Figure 6.
- Figure 6: There are two post-scan options (click to enlarge)
Browse project will allow you to modify various .INI and .INF files for advanced features such as fix file associations. Once you are finished you can return to the Build Now option.
Buried inside the ThinApp is a batch file (build.cmd) you can run to re-execute a build process located in the captures project directory. If you make changes to .INI files after the build, this allows you to rebuild the ThinApp without going through the capture process again. Once the build now process has completed, click Finish.
Finally, retrieve your ThinApp located in my case at:
C:Program FilesVMwareVMware ThinAppCapturesAdobe AIRbin
So this becomes :
C:Program FilesVMwareVMware ThinAppCapturesAcrobatReader9 in the second attempt.
Copy to a location accessible to your users' virtual desktops. I decided to copy my redirected Start menu, as shown in Figure 7.
- Figure 7: Acrobat Reader 9 ThinApp copied to a redirected Start menu
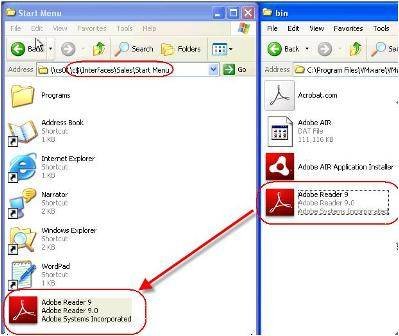

Notice how I only took the ThinApp .EXE needed. I would recommend testing the application in View client with a test account. I would also copy the entire project to my home directory or a similar location before reverting to the snapshot on the Thin App Virtual Machine and starting on a new application.
GETTING STARTED WITH VMWARE VIEW
-
- Part 1: What's new with VDI?/li>
- Part 2: Installing VMware View
- Part 3: Publishing individual virtual desktops
- Part 4: Publishing virtual desktop pools
- Part 5: Basics of VMware Composer and linked clones
- Part 6: Managing linked cloned desktop pools
- Part 7: Using a Virtual Desktop offline
- Part 8: Desktop restrictions with group policy objects
- Part 9: Installing Connection and Security servers
- Part 10:Creating and applying certificates
- Part 11: Application virtualization
ABOUT THE AUTHOR:
 Mike Laverick
is a professional instructor with 15 years experience in technologies such as Novell, Windows and Citrix, and he has been involved with the VMware community since 2003. Laverick is a VMware forum moderator and member of the London VMware User Group Steering Committee. In addition to teaching, Laverick is the owner and author of the virtualization website and blog RTFM Education, where he publishes free guides and utilities aimed at VMware ESX/VirtualCenter users. In 2009, Laverick received the VMware vExpert award and helped found the Irish and Scottish user groups. Laverick has had books published on VMware Virtual Infrastructure 3, VMware vSphere4 and VMware Site Recovery Manager.